Monday, December 16, 2013
Saturday, September 28, 2013
Mind Blowing - פסטיכאסח 2013
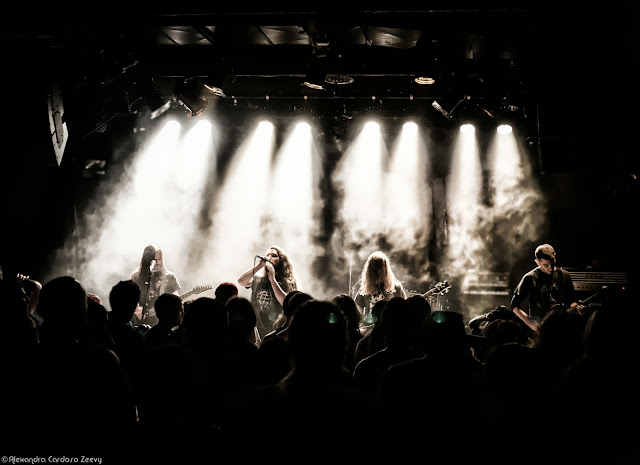
When I come home with nearly 1500 pictures, it's either because I was having fun or because I was struggling to get a good shot. I think it was both. I can't stress enough how much of a challenge it is to shoot a rock concert. The lights, the blinding flashes on the scene, the red, blue, green and every color of the rainbow spotlights, not to mention the smoke that causes flash to bounce off and blind your camera, constantly moving/jumping/trashing targets, but wow... the energy is insane! I was shooting and getting whipped with hair, trying to keep steady while everybody is moshing right behind me. On a side note, despite the general impression of barbed wire, blood sweat and tears, their hair is more like a Pantene commercial, it smells... nice.
Mind blowing.
While most photographers will frown upon the idea of using the automatic settings on their camera, I say hell yes! With the conditions changing every 2 seconds, I just don't have time to play around with the camera settings. If you think you can keep up with the action, good luck with that, you are probably a shutter freak! My Lumix G6 was so responsive on iA (intelligent Auto) and gave me just what I wanted. Fast focus, sharp pictures and overall a beautiful grain even under very low light. Out of 1500 pictures, 500 were sharp and perfectly usable, over 50 got the "beauty treatment", about 10 turned out amazing and a couple of them are making it straight into my portfolio. I say that's a pretty decent average.
Pictures are here, come take a look:
 |
| פסטיכאסח בצוללת הצהובה, ירושלים September 24, 2013 |
Monday, September 23, 2013
Get yourself out there. Now.
Stand Out.
Be Different.
Back it up.
This is probably the most important thing I learned from the moment I picked up a camera and I looked at my pictures critically.
With so many people shooting these days, most of us are doomed to remain anonymous. I haven't cracked the code to getting famous yet, but I can tell you one thing, don't wait for people to come to you with a job proposal, you have to promote yourself, you got to be generous and get out of your way to get that shoot, even if you're not getting a cent. Ultimately, you are gaining experience, new material, perhaps you'll get that incredible shot that will go straight into your portfolio. Sometimes, you have to take jobs that don't pay and these will lead to those that do pay.
We are in the world of crappy Instagram pictures. Don't be intimidated by the amount of pictures people are putting out there, be concerned with the quality and the content.
A few months ago, I started shooting a heavy metal rock band called SinTax. I had no idea what I was getting into, but I went in telling myself I can be the best. Why? Because drive and desperation will make me run that extra mile. A few months on and I realized that this was probably the biggest leap I could have taken.
SinTax will be on stage for the פסטיכסאח 2013 tomorrow in Jerusalem.
Check out the promo and see you there!
Light - Science and Magic
Since I'm right into the subject of Light, there's a particular book I find extremely interesting and a must for any photography student. It's a twenty year classic, but it never gets old and the material is always up to date. It's called Light - Science and Magic.
Now, I'm not going to do a review, but I recommend checking this YouTube video by LearnMyShot, which will give you a good overview of the material in it. And I'll repeat the man's words: If you have a question, the answer is probably in that book.
Please, do get it, it's that good.
Sunday, September 22, 2013
Light - Part 1
I'm right at the beginning of my Studio Photography Course. 46 lessons! Just the right time to start up this blog and keep you all posted on what I'm up to, both in and out of the studio.
This first part of the course, which is naturally about Light. How does it visually affect an object? The texture and shadows it produces, depending on angle, direction, intensity and type of light source. Fascinating stuff.
To fully understand this, I was handed my first task.
The Light Exercise - Direct sun, diffused light and reflected light
Material:
Camera
Tripod
Remote
5 in 1 reflector
Piece of white cardboard, large enough to shade the entire scene.
Ruler, preferably one of those with an angle.
Measuring tape
Set to be photographed with objects properly glued.
Notepad and pen
1.Create a scene using a manageable base (you will have to transport it to the studio, so get everything glued so it doesn't move an inch). I say it's better to keep it simple, but interesting. In order to see the shadows, pick a light colored base. The objects should neither be shiny, metallic, see through, black, smooth or flat.
2. Now, take you creation outside, place it on a table, directly into the sun. Look at the shadows coming off the object. If you do that when the sun is at it's peak, chances are, you won't see much and your object will look pretty flat and over exposed. If you try at mid morning or late afternoon, you'll get something completely different. The first day I tried at 5pm (in September) and the shadow was so long it came out of the frame, so I tried the next day and was ready at 3:45pm. At 4pm, the shadows looked perfect, without overlapping on others.
Direct sun, from the right side.
3. With the camera on the tripod, frame your object, being careful not to pick anything else that doesn't belong to the scene (like the table itself or shadows that don't belong to your object. Adjust your camera to no less than f8. This is the only point when you can actually move your object and choose a good looking shadow. I would strongly advise not to position yourself on top of the object (like I did!), you might run into trouble as the exercise progresses.
Very important: take note of the following measurements for each set of pictures (a sketch will also help a lot).
- Height of table
- Height of camera
- Distance from camera to center of the object
- Distance from center of the tripod to the object
- Angle of the camera relatively to object
- Hour
Put the corner of the ruler at the corner of the scene to be sure you're not moving it (anchor). Take a couple of shots with a remote.
Notice how the sun is coming straight from the side of the object and creates a sharp shadow.
Now, without moving anything, take a diffuser (careful to cover the scene completely), hold it between the sun at the object and take a couple more shots.
The shadow's look much softer now.
Diffused light, right side
Third shot. Still without moving anything (and you might need an extra pair of hands to help out), hold the piece of cardboard between the object and the sun, completely shading the set. Place a white reflector on the opposite side until you see it's light reflecting over the object. Try to aim at the center so you don't get a shadier side on the object.
Take the shot.
The shadow's are even softer than previously. You got the point!
4. Now is the tricky bit.
Without moving the ruler on the table, move the object and the tripod+camera with the object, 90 degree. It is now facing the sun and the shadows are on it's back.
Repeat all the steps from before. If you would have taken the picture from the top of the object, you would have had a hard time getting rid of the shadow of the camera itself, as it now stands between the sun and the object.
Take another 3 shots, direct sunlight, diffused and reflected.
Now, turn your set again, this time, 180 degrees so that the sun hit's the back of the object.
Repeat all the steps as before.
So that makes nine pictures. Two of them got picked and I had to reproduce them faithfully in the studio, using strobe lights. The exercise is to manage to make it so similar that it's hard to tell the difference between those taken outside and the ones taken under artificial conditions. Not as easy as it looks.
Here's the result:
Can you figure which one was taken outside and which was taken in the studio?
We'll see in the next lesson!
Cheers!
Saturday, September 21, 2013
Introduction
 So I decided to put my foot down and finally create a repository of the probably hundreds of links, books, videos, tips, product reviews, how-to projects and a wealth of information I have been accumulating these last few months. I'm a sharer at heart and more so, as a budding photographer I don't believe I should go about it alone.
I hope you'll find inspiration, maybe some answers, but most of all a friendly voice.
Subscribe to:
Posts (Atom)


